Вы используете устаревший браузер. Этот и другие сайты могут отображаться в нем неправильно.
Необходимо обновить браузер или попробовать использовать другой.
Необходимо обновить браузер или попробовать использовать другой.
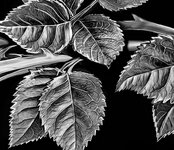
Кому-то знаком этот фильтр?
- Автор темы AlexHH
- Дата начала
КоньЕстДетей
10 лет на форуме
- Сообщения
- 2 155
- Реакции
- 1 053
GPT говорит. Многие шаги похожи на правду. Можете пробовать.
(Но выглядит очень дешево имо)
(Но выглядит очень дешево имо)
"Engraved/Illustrated Leaf" Effect in Photoshop
1. Desaturate the Image (Black & White)
- Go to Image > Adjustments > Black & White or press Shift+Ctrl+Alt+B.
- Adjust sliders to enhance contrast between veins and edges of the leaf.
2. Duplicate the Layer
- Right-click on the layer in the Layers Panel and choose Duplicate Layer.
- Work on the duplicated layer.
3. Apply High Pass Filter
- Go to Filter > Other > High Pass.
- Use a Radius around 2 to 5 pixels, depending on the resolution.
- This sharpens edges and gives the embossed vibe.
4. Add Embossing (Optional)
- Go to Filter > Stylize > Emboss.
- Set:
- Angle: ~135°
- Height: 2-3 px
- Amount: Adjust to get that carved effect.
- Set this layer’s blending mode to Overlay or Soft Light.
5. Enhance the Lines (Use Poster Edges or Find Edges)
- Go to Filter Gallery > Artistic > Poster Edges
- Edge Thickness: ~7
- Edge Intensity: ~1
- Posterization: ~2
- OR try Filter > Stylize > Find Edges, then invert (Ctrl+I) and blend.
6. Adjust Contrast with Curves or Levels
- Image > Adjustments > Levels or Curves
- Deepen shadows and brighten highlights to get that high-contrast, etched look.
7. Optional: Liquify or Oil Paint for Swirl Texture
- Try Filter > Stylize > Oil Paint
- Stylization: 2–3
- Cleanliness: 4–6
- Scale: 0.5–1.5
- Bristle Detail: 0–2
- This adds a subtle smooth, swirly texture like your image.
 Final Touch
- Consider adding a black background layer to enhance the contrast of the leaf outlines.
- Sharpen final image slightly: Filter > Sharpen > Unsharp Mask.
Последнее редактирование:
Спасибо! Достаточно информативно. Будем экспериментировать.GPT говорит. Многие шаги похожи на правду. Можете пробовать.
(Но выглядит очень дешево имо)
"Engraved/Illustrated Leaf" Effect in Photoshop
1. Desaturate the Image (Black & White)
- Go to Image > Adjustments > Black & White or press Shift+Ctrl+Alt+B.
- Adjust sliders to enhance contrast between veins and edges of the leaf.
2. Duplicate the Layer
- Right-click on the layer in the Layers Panel and choose Duplicate Layer.
- Work on the duplicated layer.
3. Apply High Pass Filter
- Go to Filter > Other > High Pass.
- Use a Radius around 2 to 5 pixels, depending on the resolution.
- This sharpens edges and gives the embossed vibe.
4. Add Embossing (Optional)
- Go to Filter > Stylize > Emboss.
- Set:
- Angle: ~135°
- Height: 2-3 px
- Amount: Adjust to get that carved effect.
- Set this layer’s blending mode to Overlay or Soft Light.
5. Enhance the Lines (Use Poster Edges or Find Edges)
- Go to Filter Gallery > Artistic > Poster Edges
- Edge Thickness: ~7
- Edge Intensity: ~1
- Posterization: ~2
- OR try Filter > Stylize > Find Edges, then invert (Ctrl+I) and blend.
6. Adjust Contrast with Curves or Levels
- Image > Adjustments > Levels or Curves
- Deepen shadows and brighten highlights to get that high-contrast, etched look.
7. Optional: Liquify or Oil Paint for Swirl Texture
- Try Filter > Stylize > Oil Paint
- Stylization: 2–3
- Cleanliness: 4–6
- Scale: 0.5–1.5
- Bristle Detail: 0–2
- This adds a subtle smooth, swirly texture like your image.
Final Touch
- Consider adding a black background layer to enhance the contrast of the leaf outlines.
- Sharpen final image slightly: Filter > Sharpen > Unsharp Mask.
Не по теме:
Толково придумано, давать ссылку на PDF, котрый любой менеджер закачек сразу хочет скачать
Похоже только внутри контуров - в оригинале контур довольно неточно обведен белой линией.
Здесь больше похоже на работу с уровнями и контрастом + резкость.Нашёл онлайн демку - XDoG Sketch. Но там параметр Thresold не регулируется.
Давно уже использовал фильтр (названия не помню), который превращал изображение в огненное. Типа, огненный конь. Регулируя уровень пламени (размер), можно при минимальных значениях приблизиться к искомому. Меня терзают смутные сомнения, что я недалёк от истины ÷)
Emergency
15 лет на форуме
- Сообщения
- 919
- Реакции
- 131
И что-то обведено вручную - см. справа внизу и не только.Здесь больше похоже на работу с уровнями и контрастом + резкость.
Emergency
15 лет на форуме
- Сообщения
- 919
- Реакции
- 131
Вместо беличьей полуулыбки появился крысиный оскал.вот, что получилось:

Старкрафт
Участник
- Сообщения
- 326
- Реакции
- 116
Весьма похоже на g'mic (pencil), хотя круче, конечно.
Вот что можно выжать из g'mic:

Картинка 600 px (размер важен). Грызун отдельным слоем, выделен очень грубо волшебной палкой. Два слоя потому, что фильтр одинаково воздействует и на грызуна и на фон. Очень шумно получается. Грызун подвергался фильтру дважды.
Вот что можно выжать из g'mic:
Картинка 600 px (размер важен). Грызун отдельным слоем, выделен очень грубо волшебной палкой. Два слоя потому, что фильтр одинаково воздействует и на грызуна и на фон. Очень шумно получается. Грызун подвергался фильтру дважды.
Последнее редактирование:
КоньЕстДетей
10 лет на форуме
- Сообщения
- 2 155
- Реакции
- 1 053
Старкрафт
Участник
- Сообщения
- 326
- Реакции
- 116
Что такое ОР и какая радость?А зачем ОР эта радость вообще нужна?
КоньЕстДетей
10 лет на форуме
- Сообщения
- 2 155
- Реакции
- 1 053
Что такое ОР и какая радость?
carry
15 лет на форуме
- Сообщения
- 2 716
- Реакции
- 1 034
Ну может он морщинистых монстров рисует. В целом выглядит так себе.Что такое ОР и какая радость?
Поделиться:


